How To Play Easy Guitar Songs Around the Campfire [FREE DOWNLOAD – Printable Easy Chord Sheet]
Morale
Few things encourage people during hard times like music. And knowing some tricks about how to play easy guitar songs around a campfire, or any place else, can be just the ticket to lifting everyone’s spirit.
Even professional guitarists use some simple tricks when they learn how to play easy guitar songs. Most songs follow a repeating musical pattern of 4 parts. And those 4 parts are the same in most songs. Even if there are more than 4 parts in a song, those parts can usually be simplified into just 4.
Understanding the Rule of 4 can help anyone learn how to play easy guitar songs in just a few weeks.
Hey, Joe! I thought that Valiant Outfitters was an outdoor, survival, bushcraft kind of place. What’s with the music lessons?
Chicks dig guys that play guitar around a campfire. You can be that guy! OK, I’m teasing, a little bit.
Seriously, every survival expert worth his ferro rod will tell you that morale is important to survival. We’ve discussed the KEY THREE {internal link to KEY THREE post} (shelter, water, food) many times here at Valiant Outfitters. Each of the KEY THREE make a contribution to your outlook in a worst case scenario. But they only go so far when faced with no access to the interwebs or TV or motor cars or a single luxury. Knowing how to provide some carbon based entertainment goes a long way when bugging-in or just trying to get through a campout with family and friends.
Second, I’m a musician. Classically trained and everything. My major instrument in college was percussion, but I’ve taught myself at least one instrument in every family of the orchestra. Even guitar, which was the most foreign to me. But I discovered some tricks along the way that helped me learn how to play easy guitar songs. Then I learned that I could use those tricks to turn not so easy guitars songs into easy guitar songs. Songs like Free Falling, Brown Eyed Girl, and even Don’t Stop Believing.
Then I noticed that the guitar players in my band used those same tricks. I’d say, “Hey! You’re just playing the same basic things over and over again in groups of four.” They’d say, “Yep,” with a wink and nod.
Third, I’m a teacher. I love to teach. I love to see people learn new things, especially things that make us all feel better.

Oh, don’t have a guitar, yet? No worries. You can continue reading for a while. We won’t get to actually playing for a few hundred words or so. I promise that I’ll give you some hints about buying a guitar.
In future posts we’ll learn how to make instruments from naturally sourced material and how to play them for sing-a-longs.
UH-OH! Who said anything about singing?! If you’ve made it this far, but are thinking…
“I can’t carry a tune in a bucket!”
Believe it or not, no one is tone deaf but we’ll get back to that.
Knowing the FIVE PARTS of MUSIC helps learn how to play easy guitar songs (or any music).

There are only two kinds of music. No, not country and western. I mean GOOD and BAD.
All good music has five parts or attributes. If something you hear has all five parts, then it’s good music. If it doesn’t have all five parts, then it’s bad music. How we define those parts might be subjective or open for opinion, but ALL good music as all five parts. In fact, I say if it has less than four of these parts, then it’s not music at all. And having all five parts gives music three dimensional space.
So, what are the five parts?
MELODY
Melody is the part of music that carries the main idea. It’s the part that you remember later on; it’s the ear worm. Good melodies help you remember what you were feeling when you heard it or help paint a picture you see in your mind’s eye. Think of the melody as a paved road that carries trucks with payloads of thoughts.
Really good melodies have a “hook” that just about everybody remembers.
If I say, “SHARK.” Just about everyone thinks of the greatest two note melody ever written. “Duuuh DUH… Duuuh DUH. DUH, DUH, DUH, DUH, DUH, DUH, DUH, DUH.” Remember the groups of four thing? Notice that the 4 slow “duhs” come before 8 (2×4) quick duhs.
Or if I mention 2001: A Space Odysey…”Dunnn, dunnn, dunnn, DUHDUNNNNN; bum-bum-bum-bum-bum-bum-bum-bum. (Notice the multiples of 4, again. Neat, huh?)
Sometimes the melody carries the thoughts in words.
Happy birthday to you.
Happy birthday to you.
Happy birthday dear, [INSERT YOUR NAME HERE].
Happy birthday to you.
You sang it, didn’t you? See, you’re not tone deaf! Oh, and FOUR phrases! (OK, I’ll stop with the four thing, four a while.)
Melody is usually the part that is sung. When you learn how to play easy guitar songs your voice, or the voices of anyone singing along, will provide the melody.
HARMONY
The second part is harmony. Harmony can be thought of as the support system for the melody. If the melody is a road surface, the harmony is like the trestle of a bridge that holds up the road when it crosses a valley or canyon. It’s not always needed, but everyone notices if it’s not there when it is needed.
Usually, this support comes from notes or pitches that are played or sung at the same time as the melody. This isn’t always true, but it will be for playing easy guitar songs.
Harmony can come from other singers or other instruments. Guitars and pianos are particularly good at providing harmony and supporting the main idea of the melody. By the way, if words are sung for the melody and harmony, then it’s best that they be the same words.
Harmony usually comes in things called chords. Chords are just multiple pitches that sound at the same time. A guitar has six strings. When we strum across all six strings then six pitches sound at the same time. For us, our guitars will provide the chords and our voice will provide the melody.
Melody and harmony both give music vertical space. Some pitches go high like a lady’s voice or a piccolo; other times they go low like a man’s voice or a tuba.
RHYTHM
The third part of music is rhythm. Rhythm is just a pattern. Usually the pattern repeats. Sometimes it repeats, then changes, then repeats back to the original.
Remember the strings on a guitar being strummed in the section about harmony? Strumming the guitar’s strings in a repeating pattern is usually best for playing easy guitar songs. The best pattern to use when we play easy guitar songs is four repeating strums, starting at the top string and gliding our hand across all six strings toward the floor like in the videos later in this post.
The rhythm or pattern is neither fast nor slow, it just is. Think of the white dashed lines on a highway. As you drive along the lines stay the same. They don’t get longer or shorter, they don’t get closer together or further apart. They’re the same no matter how fast or slow you drive, but our perception of them changes. Which brings us to…
TEMPO
Tempo is the fourth part of music and together with rhythm it gives music horizontal space. Tempo tells us how fast or slow to play the rhythm.
Put your finger under the leftmost vertical line below. Then slowly move your finger to the right of the screen.
| | | | || | | | || | | | || | | | || | | | || | | | |
Now, do it, again but move your finger quickly.
You changed the tempo. The space between the lines didn’t change. It was the same whether your finger moved fast or slow. The pattern or rhythm didn’t change, the tempo did.
So, we have melody and harmony that give music vertical space. And rhythm and tempo that give music horizontal space. Harmony will come from the guitar for us playing and singing around the campfire…or wherever.
DYNAMICS
Dynamics give music a third dimension, depth or “in-out” space. This fifth part is how loud or quiet the music is played or sung. And it shouldn’t be the same for the whole song.
Loud music usually pushes us back. Quiet music draws us in. Most music with just guitar is on the quiet side.
So, there you have the five parts of music.
- Melody
- Harmony
- Rhythm
- Tempo
- Dynamics
-CLICK HERE TO RECEIVE A FREE PRINTABLE CHEAT SHEET WITH THE 4 EASY GUITAR CHORDS THAT CAN BE USED TO PLAY JUST ABOUT ANY SONG-
The ANATOMY of a GUITAR

For our purposes we’ll be talking about acoustic guitars. The picture above is of an acoustic guitar. It doesn’t require any electric amplification to hear it. Also, we’ll be talking about six string guitars.
The basic parts of a guitar are the body, the neck, the fretboard, the tuning pegs, and the strings. That’s all we need to know for right now. The most common body type of acoustic guitar is called a dreadnought. Just think about any cowboy movie with a guitar in it and it was probably a dreadnought. The guitar in the picture above is a cut-away dreadnought. The difference between them isn’t important for you to learn how to play easy guitar songs.
This video will take you for a quick tour of a guitar and how to hold it.
Regardless of how you hold the guitar, left-handed or right-handed, the thick strings should be at the top of the fretboard and the thinnest at the bottom. The strings are all named according to the lowest pitch they can sound. From the top of the fretboard to the bottom they are…
E
A
D
G
B
e
Don’t get hung up on their names, right now. The main thing to remember for now is “thick strings at top, skinny strings at bottom.”
Next, we’re going to assign a number to the fingers on our chord hand (non-dominant hand). The index finger is 1, the middle finger is 2, the ring finger is 3, and the pinky is 4. To play easy guitar songs we’re going to call fingers 3 and 4 the ANCHOR FINGERS. That means that they aren’t going to move for the entire song, ever. They’re going to be anchors to keep our hand in place.
Now, we’re going to number the FRETS just like I showed in the video. The fret all the way out near the end of the neck is fret 1. Then comes fret 2, followed by fret 3, and so on. For right now, 2 and 3 are the most important.
Tuning Your Guitar
Before we go any further, it’s time to tune your guitar. Tuning is easy to do, but hard to explain. Demonstrating is best. So watch this video. But first, download the Fender Guitar Tuner app for your mobile device.
You can also purchase a Snark Clip-on Tuner here. It’s our favorite low cost, portable tuner.
Now, we’re ready to play our first chord.
The Four Chords I use to PLAY EASY GUITAR SONGS
The first chord we’ll learn is the G chord. There are a few different ways to play a G chord, the finger position shown below is a simplified version.

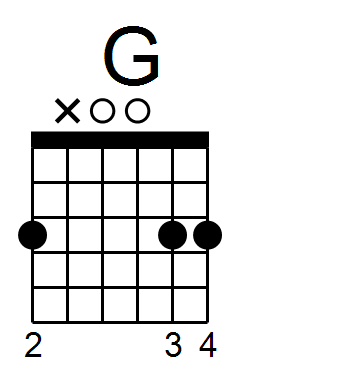
Below the picture is a graphic representation of where your fingers should be placed. Some people call this type of graphic a chord box or chord diagram. We’ll call them a chord box for now. The letter at the top is the name of the chord. The thick line near the top represents the nut that I showed in the video above. The vertical lines are the strings, the thickest string to the left and thinnest to the right. Horizontal lines are the frets, the first one under the nut being fret 1, then fret 2 under it, and so on. The dots show where to place our fingers to press the strings on to the fretboard.
I call the method that I use to teach how to play easy guitar songs the “Anchor Finger” method. For each of the four chords you’ll use, fingers 3 and 4 never move. They stay at the third fret on the B and E strings for the whole song. The only fingers that will move are the 1 and 2 fingers. Pretty easy, right?
So let’s try it. Hold the guitar the way I showed in the video, with the body resting on your leg while you’re sitting and the neck supported by your left hand (reverse if you’re a lefty). Using your left hand, place the tip of finger 4 (pinky) on the E string (closest to the floor) between frets 2 and 3. Remember that the first dot on the fretboard is probably on this fret. Then place the tip of finger 3 right next to it on the B string in the same fret. Finally, place the tip of finger 2 on the thickest string in the same fret as the other fingers. Don’t worry about finger 1, just let it go where it wants for now. Use the picture of my hand on the guitar to help check.
Let finger number 2 rest on the A string a little bit. This will keep it from vibrating. This is what the X in the chord box is for. I’ll explain it more in the video below.
Use your right hand thumb to strum down across the strings at or near the tone hole. Assuming that your guitar is in tune you should hear a pretty nice sound. It might take a few times to get the finger pressure just right and you might need to practice the speed and pressure of the strum a few times, but you’ll get it soon enough.
Now, let’s try to play some music with just one chord. Follow along in this video.
OK, we’re ready for our next chord, the Emin7 (pronounced “E minor seventh”) chord.


Lift finger 2 off of the E string. Place the tip of finger 1 on the A string between fret 1 and 2. Leave your anchor fingers (fingers 3 and 4) right where there were for the G chord.
Now practice strumming the Emin7 chord just the same way we did in the video. After you’ve practiced 4 sets of 4 use the next video to practice strumming and changing between the G chord and the Emin7 chord.
Got it? Great. Let’s learn the last two chords.
The Cadd9 (pronounced “C add nine”) is actually a pretty fancy chord, but it’s pretty easy to play. You now know enough to figure out where to place your fingers from reading the chord box. The one exception is that you wrap your thumb around the neck and let it rest on the thick E string to keep it from vibrating. (It’s difficult to see my thumb in the picture because it’s hidden behind my index finger, but trust me it’s there.)

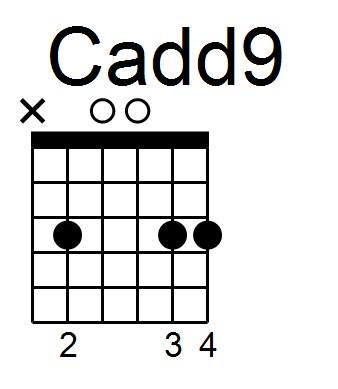
OK, practice strumming the Cadd9 chord in 4 groups of 4 before learning the last chord…
The fourth chord to learn is the Dsus chord.
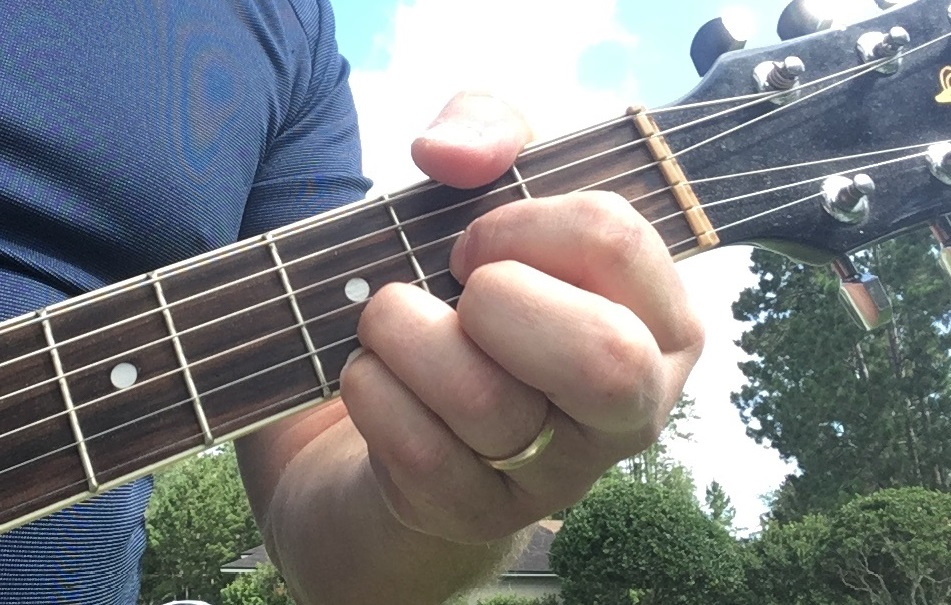
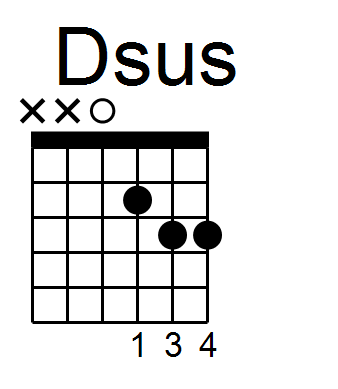
Notice in this picture that my thumb is still on the E string to keep it from vibrating. In the chord box you see that the A string shouldn’t vibrate either. I don’t have “guitar hands” so my fingers aren’t long enough for me to get all the way around to the A string. But that’s OK. With practice I’ve learned to start my strum at the D string so that the A string doesn’t sound. And if I do accidentally hit the A string it’s not a big deal because that just makes it an Dsus/A chord that still works, most of the time.
Now, practice the Dsus chord by strumming…you guessed it…in 4 groups of 4.
IT’S TIME TO PLAY YOUR FIRST OF MANY EASY GUITAR SONGS
WELCOME TO THE WORLD OF EASY GUITAR SONGS
This is just the beginning! You can use this method to play many other easy guitar songs. But there’s much, much more. There are many other chords, other strumming patterns, alternate tunings. All are within reach. The only thing between you and real guitar hero status is time and practice. There’s no secret to improving. It takes practice and determination.
But that’s what survival and bushcraft skills are all about: hard work and determination. And you now have a new skill for lifting spirits and boosting morale. Just as with any bushcraft skill it takes continuing effort to keep and improve.
To help you, please be sure to download your…
OK, if you don’t have a guitar then it’s time to think about it. Click on the link below to check out my post about how to buy a guitar, guitar case, and some accessories that won’t break the bank…plus a trick to get any $179 entry level guitar to sound like a $1500 Martin. {internal link to HOW TO BUY A GUITAR post}
Or if you have some cash burning a hole in your pocket and can’t wait to spend it, follow this link to buy our favorite backpack guitar right now. Amazon Washburn Rover Guitar including case.
Here’s a link to our review of the Washburn Rover. {internal link to HOW TO BUY A GUITAR post}
P.S. Remember when I said that no one is tone deaf? Watch this Ted Talk video of famed musician Benjamin Zander. He’ll explain why nobody is tone deaf, including you.
If you already know how to play the four basic guitar chords, then check out this link that lists 73 Songs You Can Play with the Same Four Chords, but come back because my tricks will help any musician, regardless of ability. https://www.buzzfeed.com/alanwhite/73-songs-you-can-play-with-the-same-four-chords
